Posted on

What is Arduino?

As defined by Wikipedia:

 Arduino is a single-board microcontroller to make using electronics in multidisciplinary projects more accessible. The hardware consists of an open-source hardware board designed around an 8-bit Atmel AVR microcontroller, or a 32-bit Atmel ARM. The software consists of a standard programming language compiler and a boot loader that executes on the microcontroller.

Hardware

The open-source hardware license allows for companies and individuals to make their own replicas or variations of this base design from schematics, parts lists, etc., which are available for free from the Arduino website,  see www.arduino.cc . At the heart of the Arduino Uno board is an Atmel 8-bit microcontroller, the Atmega328. The main components of the Arduino and SainSmart Uno R3 will be covered shortly.

Software

Arduino programs (sketches) are written in the C/C++ programming using the integrated development environment (IDE). Thus, if you know C, you have a great head start. If you don’t know C or any other programming languages, not to worry. This manual is designed to slowly introduce you to the Arduino programming language by giving detailed example code for each new concept covered, along with a brief explanation. So, if you already know C, you can either skim through or skip the code explanation sections. However, the examples use some unique functions and libraries that were originally written for Wiring or developed specifically for Arduino, so  these will most likely be new to all first time Arduino programmers, as well as many experienced Arduino and C programmers.

Integrated Development Environment (IDE)

The Arduino’s integrated development environment (IDE) is Java based, thus making it a cross-platform application (capable of running on different operating systems without need for re-compilation or modification of the code). The IDE is free to download from the Arduino website and is also open-source. As you will see in the first chapter, it greatly simplifies the process of interfacing to, and programming the Arduino. When you launch the IDE, it will appear as shown in Figure 1.1.


Figure 1.1 The Arduino IDE.

What is a microcontroller?

A microcontroller is essentially a small computer on a single integrated circuit (IC) or “chip”. Besides having a central processing unit (CPU), which runs your program, it has input/output (I/O) circuitry built into the chip as well.

Arduino Uno R3

The Arduino Uno is a microcontroller board based on the Atmel ATmega328 microcontroller. The board has 14 digital input/output pins (of which 6 can be used as PWM outputs), 6 analog inputs, a 16 MHz ceramic resonator, a USB connection, a power jack, an ICSP header, and a reset button. It contains everything needed to support the microcontroller; simply connect it to a computer with a USB cable (supplies a regulated 5v DC input voltage) or power it with a AC-to-DC adapter or battery (7v to 12v DC input at the barrel connector) to get started, see Figure 1.2.

Figure 1.2 Arduino Uno R3.

Posted on

How to connect SIM 900A Module with Arduino UNO?

Dual-Band 900/ 1800 MHz

GPRS multi-slot class 10/8GPRS mobile station class B

Compliant to GSM phase 2/2+Class 4 (2 W @850/ 900 MHz)

Class 1 (1 W @ 1800/1900MHz)

Control via AT commands (GSM 07.07, 07.05 and SIMCOM enhanced AT Commands)

Low power consumption: 1.5mA(sleep mode)’

Operation temperature: -40°C to +85 °C

Status indicator(D5): It will flash continuously whenever the call arrives otherwise it is left ON.

Network LED(D6): This led will blink every second which indicates that the GSM module is not connected to the mobile network. Once the connection is established successfully, the LED will blink continuously every 3 seconds.

How to connect SIM 900A Module with Arduino UNO?

Hardware and Software Required
SIM 900A Module
Arduino UNO
Arduino IDE(1.0.6V)

Hardware connections

The SIM900A module has 6pins in which two pins for Vcc and Gnd and the rest are 3VR&3VT(3volt Rx & Tx) and 5VR,5VT(5volt Rx & Tx) and the connections are made as follows:
Vcc to 5V
Gnd to Gnd
5VR digital pin 7
5VT digital pin 8

Before getting into the program part,we need to look into the AT commands which are discussed in the following used by this module. With the help of these AT commands,the user can send or receive messages, make a call and so on.

AT Commands for using the shield AT Commands for GSM

AT Press ENTER
Checking the Operation and Connection of GSM Shield. This would print OK which signifies of working connection and operation of the GSM shield.

ATD+(country code)mobile number; Press ENTER.
Making a Voice Call

ATH Press ENTER.
Disconnecting the Active Call

ATA Press ENTER
Receiving the Call

AT+CMGF=1 Press ENTER
For sending SMS in Text Mode

AT+CMGS=”mobile number” Press ENTER
Once the AT commands is given’ >’ prompt will be displayed on the screen. Type the message to be sent via SMS.  After this, Press CTRL+Z to send the SMS. If the SMS sending is successful, “OK” will be displayed along with the message number.

AT+CMGF = 1 Press ENTER
For reading SMS in the text mode

AT+CMGR = num
Number (num.) is the message index number stored in the SIM card. For new SMS, URC will be received on the screen as + CMTI: SM ‘num’.After this AT+CMGR=1 Press ENTER.This displays the message on the screen along with sender details, number and timing too.

AT Commands for GPRS

AT+CGATT?
Check if GPRS is attached or not.n=1 if attached

AT+CIPSHUT
Reset the IP session if any

AT+CIPSTATUS
Check if the IP stack is initialized

AT+CIPMUX=0
Single link mode

AT+CIPMUX=1
For multiple connections

AT+CSTT= “APN”, “UNAME”, “PWD”
Sets APN, user name and password
Starts the task, based on the SIM card you are using, you need to know the APN, username and password for your service provider.

AT+CIICR
Brings up a wireless connection

AT+CIFSR
Get local IP address if connected

AT+CIPSTART=“TYPE”, “domain”, “port”
Establishes a connection with a server. Type can be UDP or TCP.For example AT+CIPSTART= “TCP” , “www.eprolabs.com”, “80”.It starts the connection, TCP, domain name, port.

AT+CIPSEND=0, Press Enter
Request initiation of data sending (the request)
<type string>
Now type the sequence #026. This tells the terminal.exe to send the hex code 0x1a (which is Ctrl+Z) to indicate end of data sending. You should get some response back from the server…it would generally be a complain that the request string was not valid…but that is a different subject…you have established the connection.

AT+CIPCLOSE
Closes the connection.

AT+CIPSHUT
Request shutting down of the current connections.
Program for SIM 900A Module
The program given below is to make a call. As soon as the code has been uploaded the user will get a call to the number which is specified in the program. Likewise, the user can edit the AT commands as per their desired function in the program. Check the datasheet here for more details.

Posted on

Love is in the Air with E.M.I.L.Y

Love is in the Air with E.M.I.L.Y

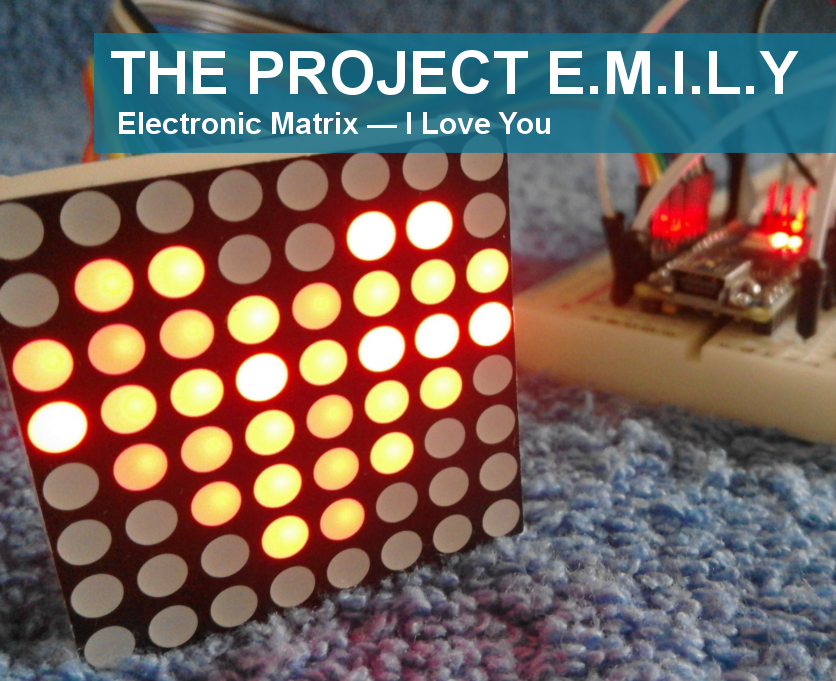
In collaboration with project creator Waren Gonzaga. Hello there, I’ve been really busy, it been a while since my last post. This project comes with full kit in our shop! What is E.M.I.L.Y?

Electronic Matrix — I Love You (also known as Project E.M.I.L.Y) is an Arduino Nano Atmega328 based electronic project for valentine’s day as a simple gift for your loved one. This project can be powered up from 3v to 5v using the input voltage source available on Arduino circuit board. I prefer to use the Vin pin for this project which is on the PIN 30. Your display will be 8×8 LED Matrix (without driver) then 8 resistors to protect your display from excessive current. This project is originally from old valentine Arduino Uno R3 project with 8×8 LED project showing animated heart. I improve the code and make it on Arduino Nano because I am thinking of a portable valentine’s gift project with Arduino Nano to discover the hidden powers of an Arduino Nano.

Below is a project collaboration with Waren Gonzaga titled Project E.M.I.L.Y.

You can visit this project here: https://www.instructables.com/id/Electronic-Matrix-I-Love-You/